gwTool6 Configuration Guide
Document version: 2.0
Applicable products: GD6-series LoRaWAN gateways using the gwTool6 Web console
UI baseline: gwTool6 v1.0.3
1. About this guide
This guide covers gwTool6 sign-in, network backhaul, LoRaWAN network-server settings, radio settings, and system maintenance. Ethernet, Wi-Fi, cellular, RF-band, power, and recovery-button support varies by GD6 model. Before configuration, verify the product label, ordering code, regional variant, and delivered firmware.
Screenshots and fields
The screenshots in this guide come from the current gwTool6 v1.0.3 test interface. LoRaWAN protocol screenshots show unsaved form selections only. IP addresses, Gateway EUI values, server addresses, and other site identifiers are fully masked. Menus for hardware not installed can be hidden or unavailable.
2. Open the Web console
2.1 Access over Ethernet
By default, the gateway can obtain an address through DHCP. Find its lease in the router, then open the following address from the same network:
http://<gateway-address>For a site that requires a static address, first sign in through DHCP or the default Wi-Fi AP, then change the settings under Ethernet. Save the settings, confirm a backup management path, and restart the gateway; the new address becomes active only after the restart. Reconnect at the new address after the gateway starts.
2.2 Access through the default Wi-Fi AP
Models with Wi-Fi can use the default configuration access point:
- Join
GD6-<Gateway EUI>. For example, Gateway EUI0102030405060708produces SSIDGD6-0102030405060708. The device falls back toLGW-Configonly when no valid Gateway EUI is available. - Enter the default AP password
wifi!0804. - Open
http://192.168.4.1.
The AP password and Web password can be changed separately, but both factory defaults are wifi!0804. Changing the AP settings disconnects the current wireless session. Before disabling Wi-Fi, confirm that Ethernet or another management path is available.
2.3 Sign in

The default Web password is:
wifi!0804Change it under Users immediately after the first sign-in. Never put a site password, API key, or private key in screenshots, tickets, or public documents.
3. System overview
Overview shows the model, firmware, uptime, storage and memory, network interfaces, active backhaul, Gateway EUI, LoRa driver, and service state. Before making changes, record:
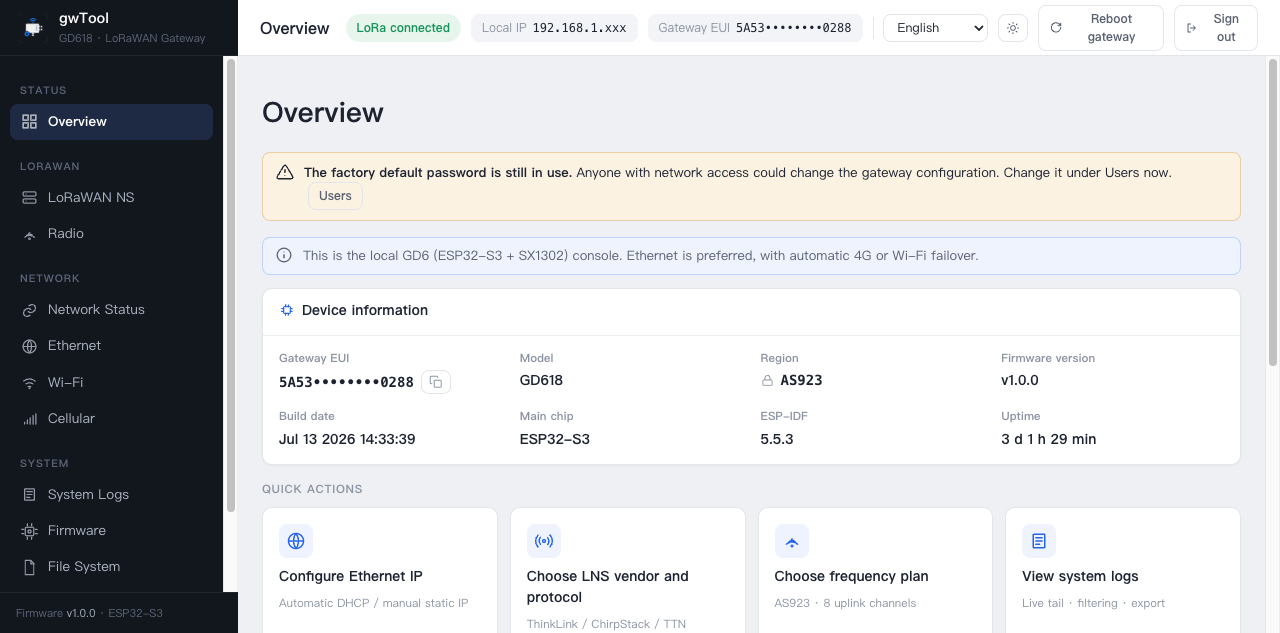
- Model, firmware version, and region.
- Gateway EUI.
- Current and backup management paths.
- Current LoRa driver, server, and connection state.
Reboot gateway interrupts the management session and LoRa forwarding. Do not reboot during firmware update, configuration save, or critical downlink activity.
4. Configure network backhaul
gwTool6 can manage Ethernet, Wi-Fi STA, and cellular backhaul. Available interfaces and priority depend on the model and installed hardware. Prepare a backup management path before changing the interface currently in use.
4.1 Ethernet
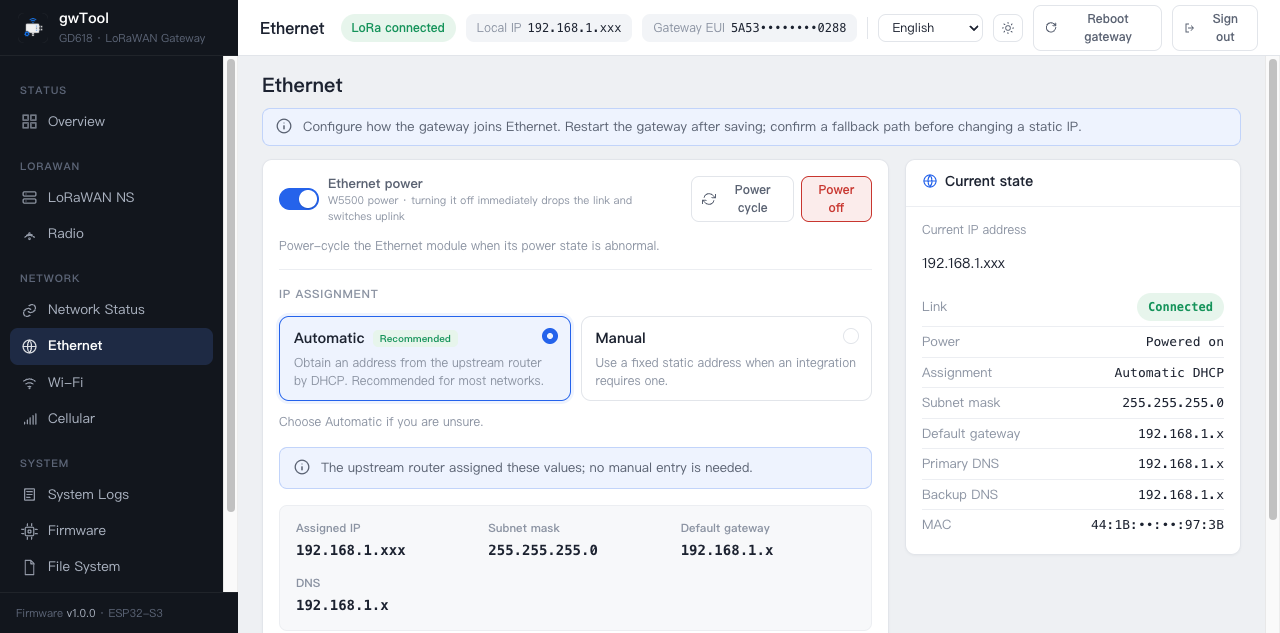
- Open Ethernet.
- Select DHCP or Static IP.
- For a static address, enter the IP address, subnet mask, default gateway, and DNS.
- Save the settings, confirm a backup management path, and restart the gateway.
- After startup, reopen the console at the new valid address.
Ethernet Power controls the gateway's internal Ethernet controller; it is not an external PoE output. Disabling or restarting the interface immediately interrupts management and uplink connections that use it.
4.2 Wi-Fi
The Wi-Fi page includes a master switch, configuration access point (AP), and site-network station (STA):
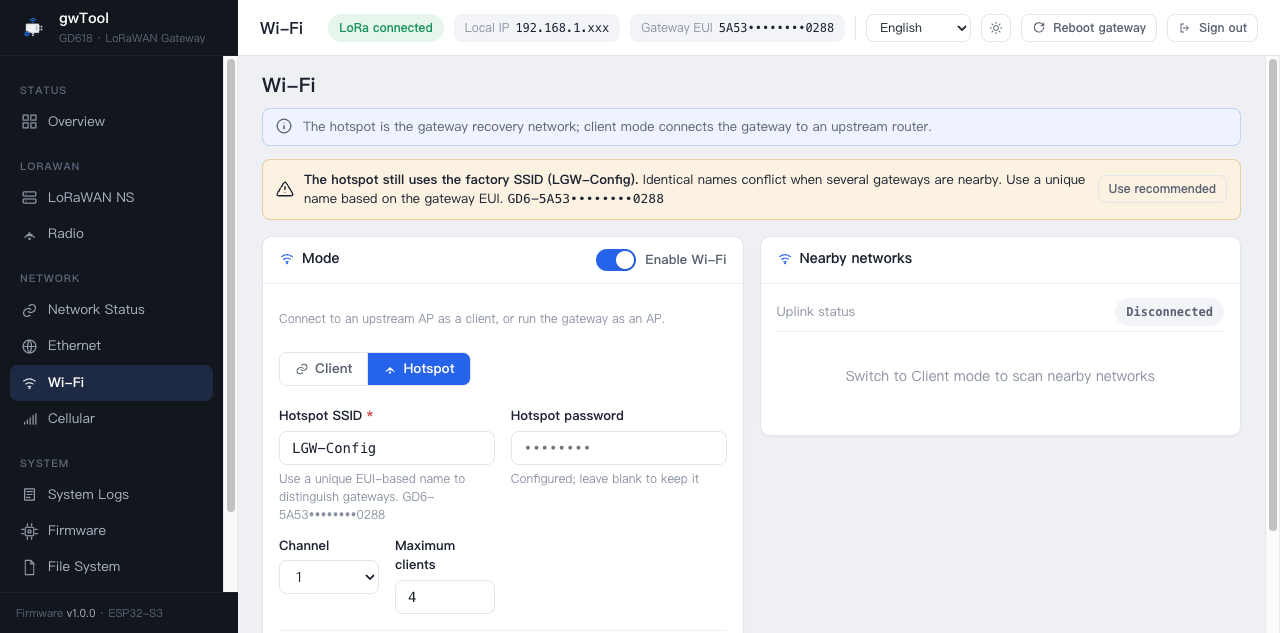
- AP: shows the Gateway-EUI-derived SSID as read-only and lets you change the password, channel, and client limit.
- STA: scans and joins a site 2.4 GHz Wi-Fi network for backhaul.
- Master switch: disables the entire Wi-Fi radio, including AP and STA.
After saving a new AP password or channel, reconnect with the new settings; the SSID cannot be customized on this page. If STA cannot connect, rescan and verify the password, signal, and DHCP service.
4.3 4G / LTE
This section applies only to models fitted with a cellular modem and SIM slot.
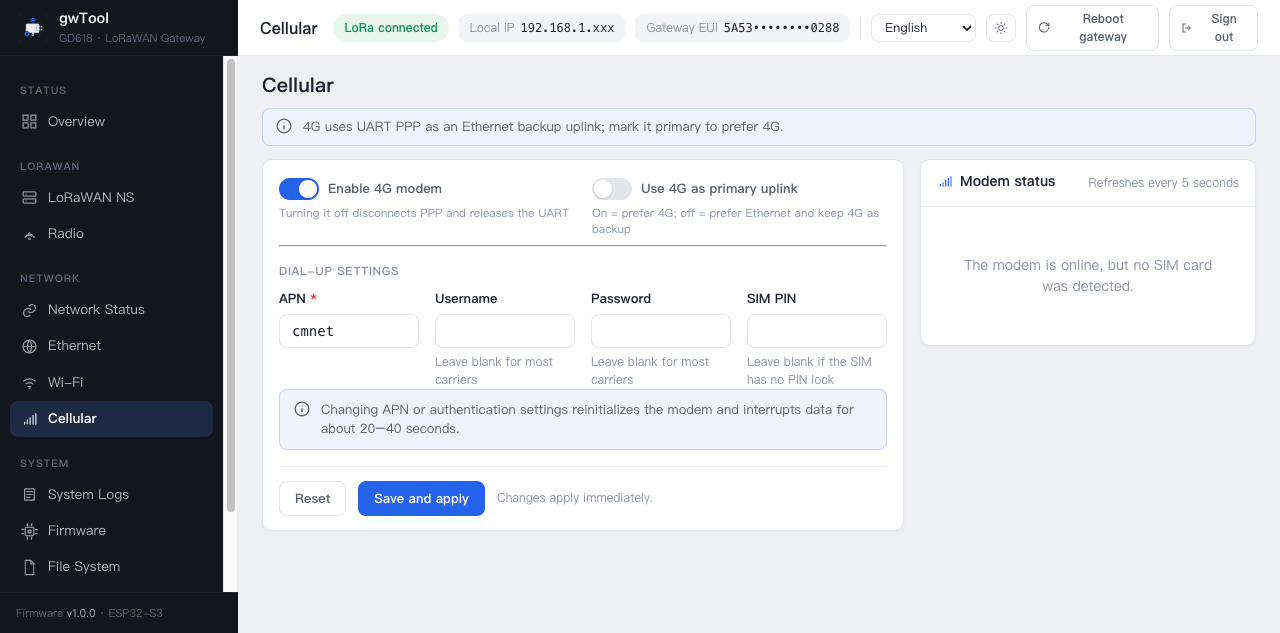
- Insert a SIM with active data service and enable the modem.
- Enter the operator APN; provide a username and password only when required.
- Enter the SIM PIN if PIN protection is enabled.
- Keep the serial settings matched to the delivered modem, set route priority, and save.
- Confirm SIM state, registration, operator, signal, access technology, and PPP address.
Mask IMEI, ICCID, phone numbers, and site addresses before publishing a status screenshot. Supported operators, bands, and SIM specifications follow the product and delivery specifications.
5. Configure the LoRaWAN server
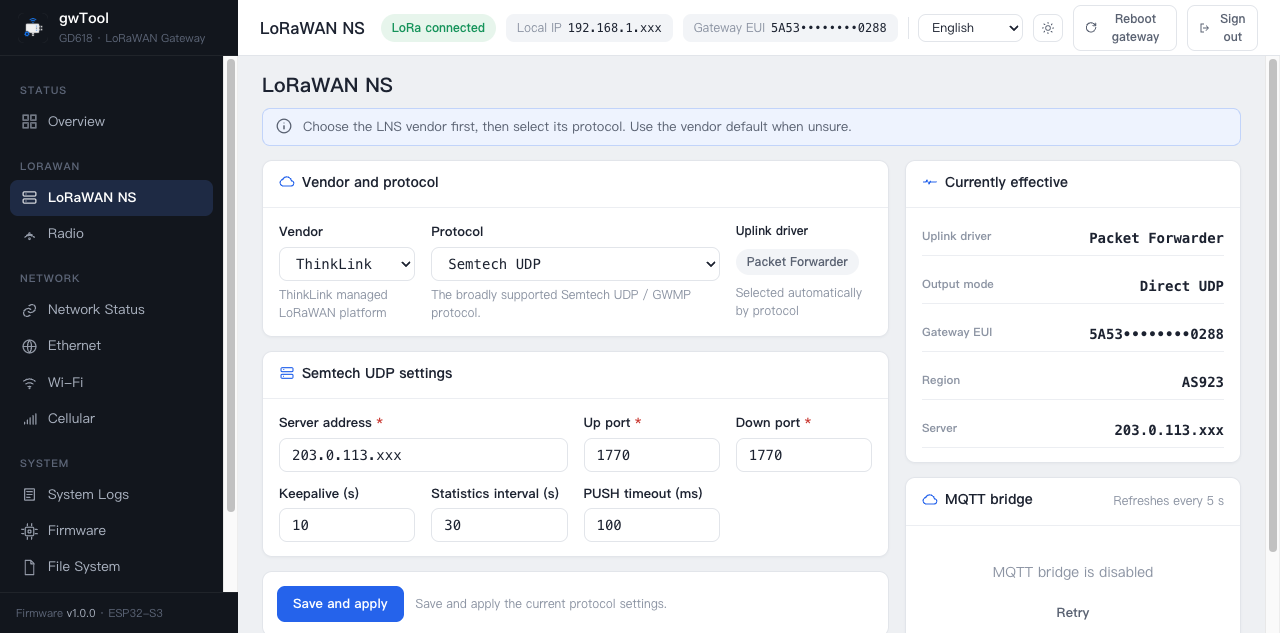
Open LoRaWAN NS, select the vendor first, then choose one of the protocols offered for that vendor:
| Vendor | Available protocols | Default |
|---|---|---|
| ThinkLink | ThinkLink MQTT, Semtech UDP | Depends on delivery configuration |
| ChirpStack | Semtech UDP, BasicStation LNS | Semtech UDP |
| TTN / The Things Stack | BasicStation CUPS, BasicStation LNS, Semtech UDP | BasicStation CUPS |
The protocol selects the uplink driver automatically. Semtech UDP uses Packet Forwarder; BasicStation LNS/CUPS uses Basic Station. Changing drivers cold-restarts LoRa forwarding and normally interrupts it for about 30–60 seconds.
5.1 Semtech UDP
- Select the target vendor and Semtech UDP.
- Enter the server address, uplink port, and downlink port.
- Set keepalive, statistics interval, and PUSH timeout as required by the platform.
- Save and apply, then wait for Packet Forwarder to recover and check the platform gateway state.
Semtech UDP does not encrypt traffic or authenticate the platform. Use it only on a controlled network or with additional network protection.
5.2 MQTT Bridge
ThinkLink MQTT is available only for the ThinkLink vendor combination. The broker URI, Client ID, account, topics, QoS, and TLS material must come from the applicable platform. Do not mix them with Remote Config MQTT settings. For mutual TLS, the CA, client certificate, and client private key must match.
5.3 Basic Station
- Direct LNS: the URI must start with
wss://; provide the server trust certificate and select API-key or client-certificate authentication as required by the deployment. - CUPS: the URI must start with
https://; CUPS can deliver and overwrite the LNS URI, trust chain, and LNS credential. - Leaving a credential input blank retains the corresponding credential already stored on the device. Verify whether an old credential must be cleared before replacement.
Driver and radio settings
Basic Station and Packet Forwarder are mutually exclusive. While Basic Station is active, the server-supplied router configuration controls the channels. Local Radio settings apply only after switching back to Packet Forwarder.
For platform-specific steps, see Connect to ChirpStack with Basic Station (gwTool6) and Connect to TTN with Basic Station (gwTool6).
6. Configure radio and bands
Radio shows the factory-locked region and lets you select a channel plan or adjust the eight receive frequencies within that region. The region comes from the factory configuration and cannot be changed on this page.
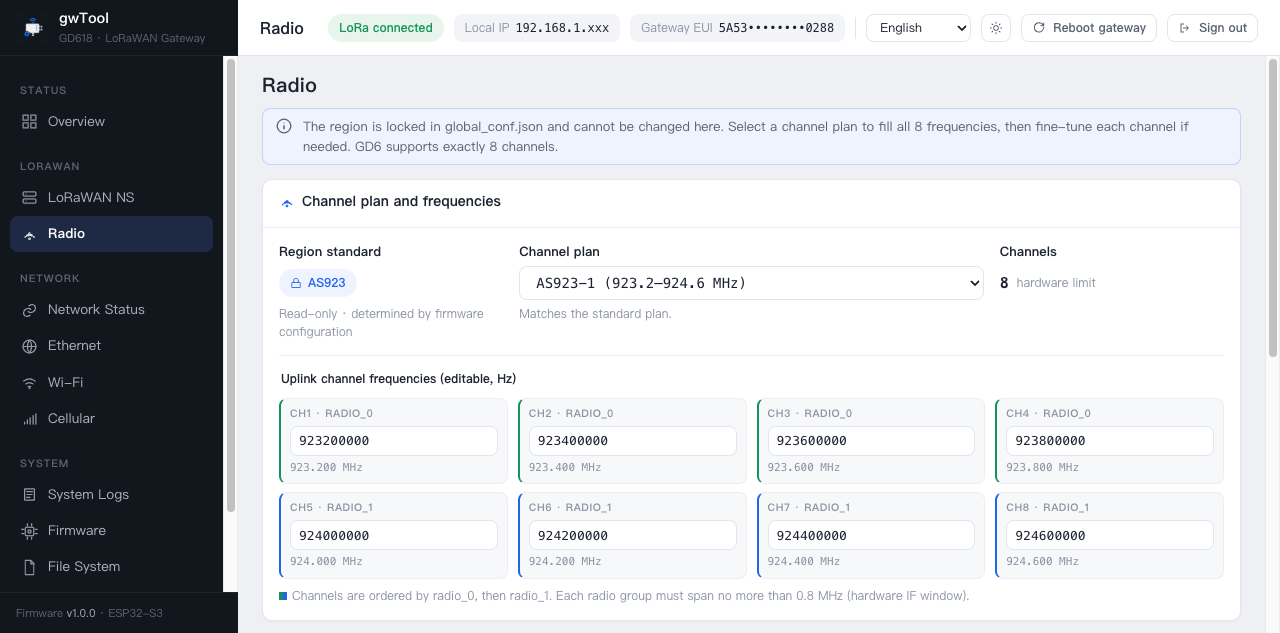
- The channel plan must match the platform Frequency Plan, end-device channels, and gateway RF hardware.
- GD6 supports eight receive channels. Frequencies within each radio group must satisfy the IF-window limit shown on the page.
- Enable Class B Beacon settings only when the deployment uses beacons.
- While Basic Station is active, maintain the channel plan on the LNS/CUPS side instead of relying on local values.
RF hardware limitation
Changing a Web setting cannot convert hardware for one frequency band into another. An incorrect region, antenna, or frequency combination can prevent communication or violate local regulations.
Use Save and apply after a change. Restart the LoRa forwarder or system only when the page or maintenance procedure explicitly requires it.
7. System maintenance
7.1 System Logs
System Logs shows messages from Web, networking, Packet Forwarder, Basic Station, MQTT, and the cellular modem. During diagnosis, record the operation time, selected vendor/protocol, and errors. Mask addresses, EUI values, tokens, certificate content, and site network identifiers before sharing logs.
7.2 Firmware
- Verify the model, hardware revision, region, and current firmware.
- Select only a Web OTA
.binfile that exactly matches the device. - Wait for upload, validation, and writing to finish. Do not refresh, disconnect, or remove power.
- Reboot when prompted, sign in again, and verify the version and critical settings.
Do not upload a full-flash manufacturing image through Web OTA. Save the current network, LoRaWAN, and radio settings before an update.
7.3 Filesystem
Filesystem is for controlled maintenance of /spiffs configuration. Replacing or deleting web/ assets can make the console inaccessible, and factory reset might not restore them. Do not modify the filesystem unless support provides the exact file, checksum, and recovery procedure.
7.4 Users and password
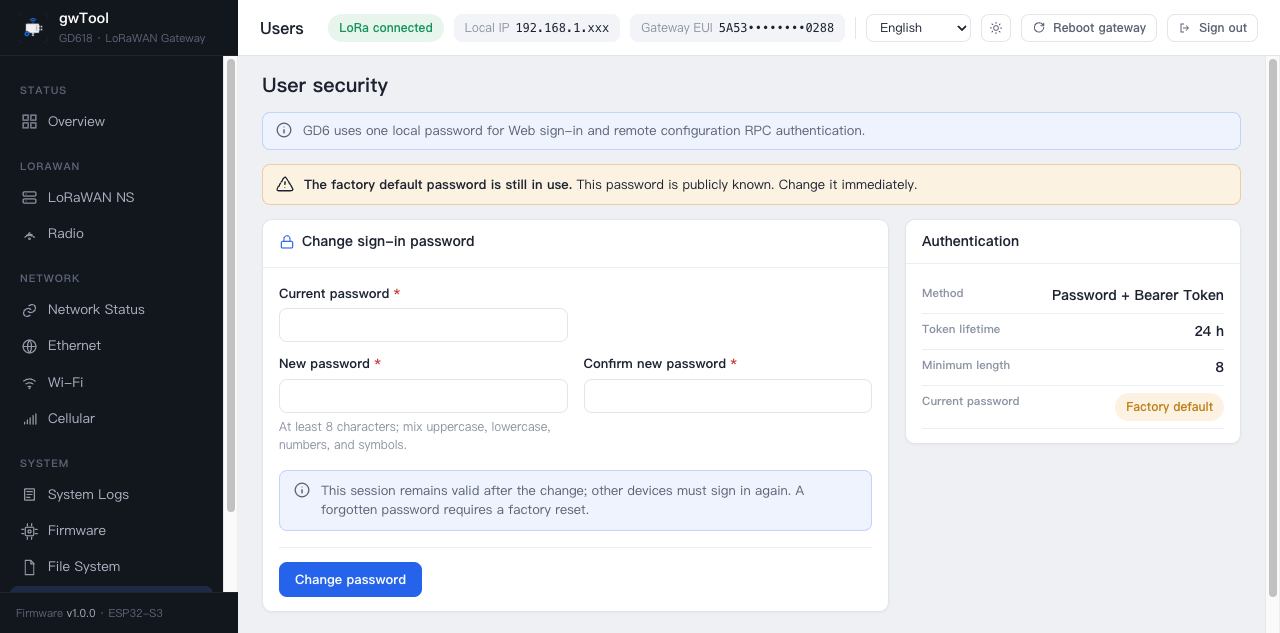
Current UI message differs from token behavior
The “other devices need to sign in again” UI message shown in the screenshot is inaccurate. In v1.0.3, changing the password updates password storage but does not revoke issued Bearer tokens; existing sessions remain valid.
Open Users, enter the current password, new password, and confirmation, then save. The new password must contain at least eight characters. Changing the password does not revoke existing Bearer tokens: an existing session remains valid until its token is revoked by sign-out, expires, or the gateway reboots. To invalidate all in-memory sessions immediately, reboot the gateway in a controlled maintenance window and sign in again.
7.5 Remote Config
Remote Config uses an independent MQTT channel to manage allowed device settings. Its broker, Client ID, topics, QoS, and TLS credentials are separate from the LoRaWAN data channel. Prepare a local recovery path before enabling it so an incorrect remote change cannot leave the device unreachable.
8. Factory reset
The trigger, press duration, and indicator behavior depend on the model; follow the product manual. Factory reset restores network, LoRaWAN, and system settings. It does not necessarily overwrite the Gateway EUI, Web assets, or manufacturing data.
After reset, the default Web password is wifi!0804. Change it immediately, then recheck the region, network, LoRaWAN server, and radio settings.
9. Configuration troubleshooting
| Symptom | Checks and recovery |
|---|---|
| Web console cannot be opened | Confirm that the client and gateway share a subnet and check the DHCP lease; Wi-Fi models can use the default AP at 192.168.4.1 |
| Default login fails | Confirm that you entered the Web password rather than the AP password; use the controlled recovery procedure if the password was changed |
| No Ethernet address | Check the cable, DHCP, static-address conflicts, and Ethernet-controller power |
| Cellular network will not register | Check the hardware model, SIM, PIN, APN, antenna, signal, and modem bands |
| Wi-Fi STA will not join | Rescan the 2.4 GHz SSID and check the password, signal, DHCP, and AP access restrictions |
| No LoRa uplink | Check the antenna, region and channels, Gateway EUI, vendor/protocol, server address, and backhaul |
| Basic Station TLS fails | Check system time, URI scheme, server certificate hostname, trust chain, and authentication mode |
| Briefly offline after save | A driver change cold-restarts LoRa forwarding; wait 30–60 seconds, then reread Currently effective |